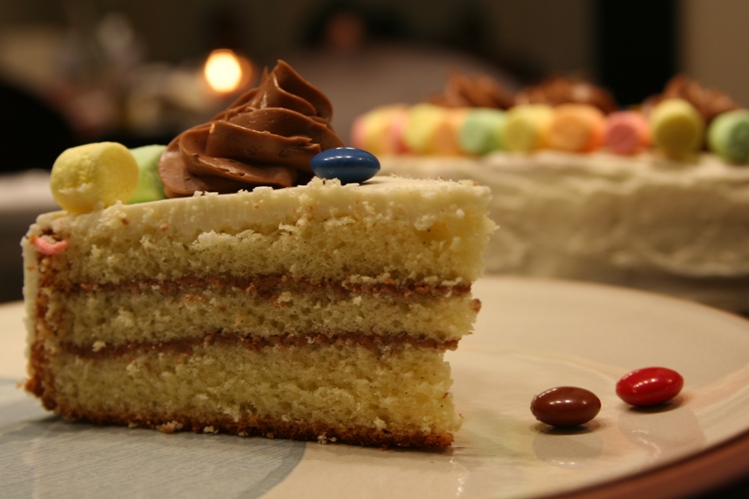
I tried to separate the process into 2 days so that I wouldn’t need to stay up all night to make the cake. The vanilla bean sponge cake was baked 2 nights ago. I left it in the freezer for easy cutting. The buttercream was a challenge to me since I had never successfully made one before. Last night, thanks to Jennifer's support over the phone, I finally made it right. However, when I cut up the cake from the freezer, I found lumps of flour in the cake because I was too rushed that night and didn't fold it in the batter properly. Sorry Chef Amjad, I should have followed your instructions step by step. I had to bake a new cake. At the end I was so tired that I couldn't even space the chocolate rosettes properly on the cake. I had planned to put Smarties and marshmallows on it for decorations but I decided to clean up the kitchen instead and let me artistic husband to do rest of the design, because it was 3a.m. in the morning already! I think he did a great job!

I had cut the sugar in buttercream to half. 5 cups of buttercream with only half a cup of sugar, too bad I think. The thin buttercream layer kept moisture in the cake very well too. Next time I’ll add more vanilla bean though. I have increased the amount in my recipe below.
Ingredients:
Vanilla Bean Sponge Cake
225g bread flour
225g sugar
7 extra large eggs
1 ½ vanilla beans
1/8 tsp salt
Method:
1. Spray a 9” springform pan with cooking spray then line with parchment paper.
2. Cut vanilla bean lengthwise and scrape the seeds out.
3. Use paddle attachment with your standmixer, beat eggs, sugar and seeds from vanilla bean on high speed for 12 mins to ribbon stage. The volume should reach at least as high as what you see in the picture shown below.
4. While waiting for the batter to be ready, preheat oven to 380F.
5. Fold in sifted flour in 3 batches. Be careful, the flour sinks fast. Make sure you reach to the bottom when you fold.
6. Pour batter into lined pan, give it a little shake to level it.
7. Bake for 30-35 mins or until cake tester comes out clean. Cover with foil midway if it gets too brown on the top. The top will be cut out anyway but you don’t want any burnt smell in your cake.
8. Put the cake in freezer until day of assembly.
Martha Stewart’s Swiss Meringue Buttercream
5 large egg whites
½ cup + 1 tbsp of sugar
4 sticks butter (454g) cut into 1 tbsp size cubes
1 ½ vanilla extra
50g semi-sweet chocolate chips (optional)
- In the heatproof bowl of standmixer set over a saucepan of simmering water, combine egg whites and sugar. Whisking constantly, until sugar has dissolved and mixture is warm to the touch.
- Attach the bowl to the mixer fitted with the whisk attachment. Beat the egg-white mixture on high speed until it holds stiff peaks. Continue beating until the mixture is fluffy and side of the bowl is cooled.
- Switch to the paddle attachment. With mixer on medium-low speed, add butter several cubes at a time, beat well after each addition. (If frosting appears to separate after all the butter has been added, beat on medium-high speed until smooth again, 3 to 5 minutes more.)
- Add vanilla and beat just until mixed. You should have 5 cups of buttercream here. If you want to make some of it in chocolate flavour, put 2 cups of buttercream aside and beat for 2 more minutes on the rest to remove any bubbles left. Scoop out to separate container.
- To make chocolate buttercream:
- Melt the chocolate chips in double-boiler or a heatproof bowl set on simmering water.
- Once the chocolate has melted, wait for it to cool, about 30 mins.
- Mix melted chocolate and the reserved 2 cups of buttercream in the original standmixer bowl (less washing to do!), paddle for 2 mins until mixed.
- Keep all buttercream in room temperature if using it in one day. Keep it in the fridge for up to 3 days, in freezer for up to one month.
Assembly
- Cut top of the cake and discard. You can save it for decorations which need cake crumbs.
- Cut the cake into 3 layers.
- Brush sugar syrup on bottom layer, then cover it with chocolate buttercream.
- Put second layer on top and repeat step 3.
- Put the top layer on. Cover it with vanilla buttercream.
- Pipe chocolate rosettes on top and add other candies if you like.
Livie did her own design by adding more Smarties on!


No comments:
Post a Comment