Tuesday, March 30, 2010

Bacon Wrapped Boursin Stuffed Chicken Breast


http://www.recipezaar.com/recipe/Bacon-Wrapped-Boursin-Stuffed-Chicken-Breasts-a-Deux-214740

Another recipe picked from Recipezaar.  After this, I concluded that I'm not a white meat person.  Sorry, I just don't find it juicy enough for me.  Looked nice on the plate though.  Even though I believe the chicken breasts were not much over cooked, I didn't like the texture.  I know it's just me, because Adrian liked it so much that he ate 5 full slices of them and asked for more.  I had to stop him since he already had pasta to go with them. 

The dish is very easy to make.  I don't have a chef's mallet at home, so I used the handle of my metal ice-cream scoop to beat the chicken breasts to the required thickness.  I used a small wooden roller at the beginning but almost threw it at the stove!  Holding the ice cream scoop on the round side gave me a good grip.  Finally got thin slices of chicken breasts and spread boursin cheese on each and rolled them up.  I know the size and thickness were right because I used exactly 3 slices of bacon to wrap each roll.  Did all this the night before.  I couldn't find any cherry tomatoes, just replaced them with regular tomatoes.


Maybe I didn't put enough cheese on.  I may still make it again, just that I'll replace the boursin cheese with brie and check doneness after leaving it in the oven for 40 mins.  I may also soak the chicken breasts in yogurt before wrapping the brie in it.  The texture may come out better.

Here's the cut up view. 


Adrian's review was one thumb up, Livie's was one thumb side way.  Mommy needs more practices to please the little princess!

Monday, March 29, 2010

Question to Teacher

My kids are very social, especially my son.  He will talk to anyone.  We have to keep reminding him the danger of talking to strangers.  He also asks a lot of questions.  Sometimes we find that he knows more than we do.  On Friday Livie told me that her teacher was off and wouldn’t be back until Monday.

Me: Do you have another teacher who helps Mrs. Griffith for now while Mrs. Chan is away?

Olivia: Yes, we have a Mr. Lee.

Me: I haven’t heard of him.  Is he new?

Olivia: Yes.  There is a Mrs. Lee too.  She’s in another class.

Me: Is Mr. Lee from another class?

Olivia: He’s from upstairs.

Me: Oh…  That Mrs. Lee is Mr. Lee’s wife?  (In case they are just temporary volunteer helpers.)

Olivia:  Yes.

Adrian: No!  They are not married to each other.  They are just friends.

Me: How did you know?

Adrian:  Because I asked him.

Mr. Lee and Mrs. Lee are not even in Adrian’s class.  You can imagine the scene when Adrian walked up to the teacher and asked him about his “relationship” with another teacher.

Sunday, March 28, 2010

菜肉包 (Chinese Steamed Buns with Bok Choi and Pork Filling)

Not really a baking item but it's kind of a bread to me.  So I'm adding this with my other bread post in this category.  This picture shows the look before I put them in the steamer.  Since my kids love Hua Juan (花卷), I've been trying to look for a recipe for a long time.  I recently found this one online.  http://allrecipes.com/Recipe/Chinese-Steamed-Buns/Detail.aspx

When I was reading it, I thought, wouldn't it be nice if I could make that into a meal for Adrian to take to school for lunch.  So I decided to use the same dough recipe for 菜肉包.  Since I don't trust myself in marinating the pork.  I asked our nanny (she used to look after my kids before they went to school, now she comes once a week to help me cook and clean) to do it for me.  She told me that if I want the veggies to stay crunchy after being steamed, I had to marinate the veggies with salt first, then stir fry them before mixing with the pork for filling later.  Now that's something I couldn't learn from internet.  But there is one idea she suggested turned out to be a not so good one, which is adding garlic.  I think she added too much, so the filling tasted a bit too garlicky, or even somehow tasted like raw garlic.  I could tell the pork was cooked but...  strange taste.

The buns by themselves are fine.  My nanny actually asked me for the recipe because she liked it so much.  Here are some pictures of the making process:

I made 菜肉包 with most of the dough.

I also made Hua Juan 花卷.  I saw a picture online showing people to cut a few lines on a flattened dough, then twist it to make a Juan 卷.

After filling the buns, I let them proofed for the second time.  They look a lot bigger and the patterns I put on the seams are almost gone.

I don't have bamboo steamer at home but I do have a double layer steaming pot.  I wasn't sure if the buns would keep expanding, so I laid them out loosely apart.  See the Hua Juan 花卷 on the right hand side?

Here they are, steamed buns with and without filling.  My nanny said the ball shape one without filling cannot be called Man Tou 饅頭 because the texture should be different.  All I can call it is a 無料包, bun with no filling.


When I tore the one with filling apart, meat was juicy, bun looks ok too.  Yet like I mentioned before, the filling tasted overly garlicky, I couldn't taste the bun properly.

My son gave it a one thumb sideways, which means only ok for him.  So I tore the 無料包 bun with no filling to see.

Looks like the real thing at restaurant.  Not bad.  Taste was good too.  My kids were all anxiously waiting for the Huan Juan 花卷.  I gave it to them, of course with their favourite condensed milk for dipping.  Result is:


I find the recipe not enough to make 24 regular size buns.  I followed it diligently but got really small buns.  I'll increase the bun size next time.

Update:

I went to check the comments on original recipe, most people use the dough to make fewer buns.  I should have read them before making it.  I also heated the meat filled buns for lunch today at work.  The garlicky taste was not as strong.  Haha, maybe the garlic was not cooked through yesterday!  Yet the pork was cooked...  Well, I ate them already!

Saturday, March 27, 2010

Monopoly

This is the 3rd year we have participated Earth Hour.  Adrian reminded us that last year we all played monopoly together under candle light.  Of course they didn't understand the game at that time.  We just raced to the final point, the fastest one won.  This year, we played the proper way.  Olivia didn't understand it clearly but she played along anyway.  It was my turn again, I got the chance card which sent me to jail.  Then it's Adrian's turn to move.  Suddenly daddy realized that Livie looked sad and down.  He held her and asked her what's wrong.  Livie said:

"I don't want mommy to go to jail..."

She really loves us very much.

Swiss Rolls - Baking Arts Week #10


Personally I'm not a big fan of Swiss rolls, my mom is.  Yet I understand what we would be learning from class is different from my mom's favourite Hong Kong style rolls.  It's good to see if there's any tricks behind to keep the sponge cake from breaking in the rolling process though.

Voila!  Bread flour, high temperature, and short baking time are the keys.  Bread flour to hold to volume, high temp to cook the batter fast, and short oven time to keep it moist.  After watching our instructor literally "folding" the sponge cake but the cake still didn't break, I thought it's failure proof.  However, mine still broke.  The instructor said I rolled it too tight.  Therefore, one more trick - roll it loosely.

I did 4 different designs on my rolls.  First 2 had way too much cream on them.  Haha, real reason was, I had to use the cream to cover the flaws, i.e. cracks.  Last 2 were better I believe.  I added more almond crumbs on top of one.  (Picture on top of this post)  Not as plain as the other ones.

Here are all 4 of them lined out.  Just like how my son likes to line his cars on the mat.


I find the sponge cake texture feels a little bready.  If I'm going to do it again, I may use cake flour to keep the volume and see if I can get a lighter texture, IF, I'm going to make it again.

Friday, March 26, 2010

Slimy Puddy

Last year Adrian was invited to a friend's birthday party.  One of the gifts in loot bag was a slimy puddy.  Honestly I really don't know why anyone should play with these things.  They are as slimy as the name, residue stays on your hand and little pieces fall off here and there.  There was also a long warning message on back of the packaging telling you that it will stick to clothes.  Yet it didn't tell you what to do if you have it stuck anywhere.

So, Adrian had lots of fun at the party.  When I asked the birthday child's parent about the puddy, "What do you do with this thing?"  She told Adrian, "You can throw it at people."  Urgh...  Thanks.   I reminded Adrian many many times, play carefully, or rather, DO NOT play with it.  He does follow instructions well, he didn't touch it that day.

Next morning, Adrian woke up before Ho and I.  He happily came to our bed, wanted to show us his loot bag gifts.  While I was half asleep, suddenly I remember that puddy.  I sat up trying to remind Adrian about it.  It's too late!  I heard daddy screaming, "What's that on my hair?"  Oh no!  Daddy had very long hair last year, his artistic look!  I cannot describe the expression on daddy's face.  Remember there was no instruction on how to remove the slime?  After daddy tried to pull the slime out of his hair for 15 mins, I suggested, "Maybe it's time for you to go back to your short hair look."  Daddy said the slime was stuck close to the scalp that he might need to shave his hair off.  I know he was cursing in his mind, but he had good control of that in front of the kids.  Suddenly I thought of the alcohol patches we had at home.  Those are for medical use.  Since I don't use nail polish, alcohol will be our closest bet compared to nail polish remover.  More than 1 hour later, after using about 50 alcohol patches, finally we got the slime out.

Adrian was so scared all that time, he didn't say a thing.  At the end, I told Adrian to say something to daddy.  He went up to daddy and said, "Sorry daddy."  At least we know for sure he won't play with those slime thing ever again.

Thursday, March 25, 2010

So Sweet

Adrian loves his family a lot.  He also started to talk very early.  I remember when I told Jennifer that Adrian could make the "ma" sound when he was 5 months old, she said me I was hallucinating.  Then Adrian said "ma ma" right after.  Of course he didn't mean to call me, but it was amazing to hear a baby could make such a sound so young.  Adrian likes to listen to us chatting too.  If Ho and I were silent for awhile, he would tell us, "你哋傾偈啦!" (please chat).   Of course I have to chat with him a little while every night when I tuck him to bed.

This happened when Adrian was about 2 and 1/2 years old.  I had not been sleeping well because Adrian had night terrors a few times since Livie was born.  I had acne on my face.  That night I was tucking Adrian to bed as usual.

Adrian:  媽咪,你塊面呢粒咩嚟㗎? (Mommy, what is that on your face?)

Me: 呢D叫暗瘡,你同妹妹成日唔瞓覺,攪到媽咪唔夠瞓就會生瘡㗎喇。(That's called acne.  I can't sleep well because you and Livie are keeping me up all the time.)

Adrian suddenly pushed me on to the bed and covered me with a blanket.  He said:

"你快D瞓啦,咁就唔會生瘡瘡喇!" (You go to sleep quickly, then you won't get acne)

He's so sweet.

New England Roasted Cornish Hen


http://www.recipezaar.com/New-England-Roasted-Cornish-Game-Hens-28029

Recently passed by a restaurant which I used to go to a lot in Scarborough.   It's called 老地方.  It reminded me of their really good Cornish hen dish.  I remember I ordered soy milk with it all the time too.  Those were the days when I first immigrated to Canada.   Since my family loves to eat and I was the first one in the house who had a driver's license, I drove my parents, brother and niece  everywhere to try new restaurants (my sister-in-law had not arrived at Toronto yet).  This 老地方 was the farthest one I drove to.  I wonder if their dish still tastes as good as before.   When I saw the hens at grocery store, I had to pick them up, just for the old days.

Since this is the first time I had ever made a meal with Cornish hen, it's safer to follow a successful recipe.  This is a very easy one.  8 good reviews on Recipezaar.  I meant to marinate the hens last night.  However, I felt asleep at Livie's bed again.  Luckily I could get up early to prepare the dish.  It took me about 20 mins to wash the hens, split them into halves and then marinate them.  I would never buy zipper bags from dollar store anymore.  My meat fell out from bottom of the bag again.   Last tune was the ribs, this time was the Cornish hens.  I had to spent 10 more mins to clean up the mess.  I called Ho to take the hens out from the fridge when I was on my way back home from work.  By the time I got home, The hens were almost at room temperature.  I put the hens in the oven immediately.  While waiting for the hens to be cooked, I made honey garlic veggies and pasta with Alfredo sauce.  Kids' comments?  See them for yourself...


Livie said, "It was an awesome, bossome (?), blossom dinner!"  Adrian wanted to bring the same thing for lunch tomorrow.   Compared to the days when I spent so much time making varieties of baby food in exchange for my kids saying, "No, I don't want it!", nothing can be more satisfying to me than receiving compliments from them.

Here's Adrian's lunch box tomorrow. :-)

Tuesday, March 23, 2010

Scallops Carbonara

Even though my mind was well trained by my mom that every dinner should consist of a full table of food, being a working mom, I need to find all the one-dish dinner ideas I can get.  Sometimes just pick up something different at the grocery store and decide what to do with it later can be refreshing.  That's what I did this time.  Got this recipe from my favourite Recipezaar website. http://www.recipezaar.com/Scallops-Carbonara-103457


The original recipe required white wine and toasted red pepper.  I had neither of those, so I used sake and asperagus instead.  Adrian kept saying, "I smell something good!" while I was cooking.  Of course, he was smelling the bacon, sake, shallot and garlic.  Yum, I liked it, daddy liked it, Adrian liked it (except for the veggies), Livie only wanted plain pasta but she finished 2/3 of the pasta with sauce in her bowl.

When I cleaned up the kitchen, I saw some leftover bacon and asperagus, don't want to waste them so, I made:


Very satisfied!

Monday, March 22, 2010

Dentist

We don't allow Adrian to eat too many candies but he still got a big cavity in one of his teeth when he was around 4-5 years old.  We took him to see the dentist for the first time.  Knowing Adrian's way in reacting to new unpleasant things, just the trip to dental office was nerve-wracking.

We went to this dentistry for children on Highway 7 recommended by our pediatrician.  The nurses were very nice.  First they brought Adrian to their DVD collection.  Adrian found his favourite movie "Cars".  Then it's his turn to actually lie down on the chair.  Dr. Lin gave him cartoon sunglasses to block the bright light from above.  The DVD started.  Since I told them that Adrian was scared of the previews, they fast forwarded to beginning of the movie.  Both the Dr. Lin and the nurse Yolanda kept talking between themselves about the Disney or other kids movies they had seen, new ones coming to the theatre...  Sometimes they asked Adrian for his opinion too.   They did a good job in distracting him.  Wow, Dr. Lin told me that Adrian needed a root canal done!  All this time Adrian was enjoying the movie, no complaint at all.   So I told them to go ahead with it.  They had everything done within 45 mins.   I was so glad that I took him to this dental office.

When we were on the way back to school in the car, Adrian told me that he would like to be a dentist in the future.  I asked him why.  He told me:

"I can watch TV while cleaning teeth for my patients.  I will set up an office in the school cafeteria for the students to clean their teeth at lunch time."

Perhaps he forgot that Dr. Lin wasn't looking up at the TV on the ceiling when he was cleaning his teeth.

Strawberry Pavlova

Remember I gave a preview of what I was making Saturday night at the end of my Black Forest post?  After the stressful experience I had at the GB Black Forest project, I made this easy pavlova just to boost up my confidence.  I was worrying about the shape of the meringue when I saw it in the oven.  Instead of a valley in the centre for holding the cream and fruit, I had a little hill.   On day of friend's house-warming party, I couldn't go to pick up fresh fruits from store because we left the house late as usual.  Luckily I had cream and some strawberries in my fridge.

This was how the pavlova looked like before I started to put any topping on.  Rather square looking, isn't it?  The crack on top is ok, seems like it's hollow inside when you look closely.  It means the meringue has a thin crust.


You cannot put the cream on this dessert too early, otherwise the meringue will be softened.  Not knowing if my friend had a mixer at her new house, I brought the hand mixer with me.  I started to put the cream on, carefully not to put it too close to the edge.  Don't want it to fall down on the side!  Ok, cream is staying put.  Now the strawberries.  Few pieces by few pieces I added...  "Crack!"  the pavlova collapsed!  haha.  Ended up I didn't need to put a valley there when I baked the shell.  So funny!

Thanks to my friends, one of them took this picture for me with his I-phone.  Even though the resolution is low but it gives you exactly the same view I had when the weight of strawberries and cream brought the meringue down.  You can see thickness of the crust after part of it fell to the centre.


I forgot to bring icing sugar to beat the cream with.  Honestly I like it better this way because this dessert is way too sweet for me.  Flavour of sugarless cream and sweet strawberries blended in with the meringue very well.  This is the second post I have on pavlova.  Last time I had 2-coloured fruits - raspberries and blueberries.  Strawberries only looks good too.  Since I saw some soft meringue residue on the parchment paper when I transferred it to the dessert tray, I thought this one was undercooked.  It was not.  Happy...

Last piece left!  Well, my beloved husband had 3 servings.


Another friend took these sliced view and overview pictures of my pavlova.  I have to post them all, otherwise he may not take pictures for me in the future :-)

This is the best pavlova recipe I've tried.  You can adjust the sugar level to as low as 6.5 oz.  Any amount lower may not give you the stiff peak when beating the egg whites.  The meringue may not be baked properly that way.

http://www.joyofbaking.com/Pavlova.html

Saturday, March 20, 2010

Black Florest Cake - Baking Arts Week #9

Wow, this was the most stressful class for me so far.  While I was struggling to put cream on the cake, I tried and tried.  No matter how much cream I added, the side of the cake kept showing after I smoothed the cream with a spatula.  While all the people around me were finishing their first cake, starting the second one, I was still masking my first one.  The others were washing utensils, tidying up, I was still smoothing my cake!  I so wanted to finish it and leave...  So frustrating.  Turned out that the instructor said I had reversed the base plate that was holding the cake.  No wonder.  Cherry tried to help me but I didn't want to slow her down.  I ended up to be the last one in the class to leave.  Students from the next class had arrived, but I was still washing the mixing bowl...


One thing I'm happy about is the chocolate shavings I made.  They really look like logs in the forest. :-)


I felt totally defeated after this class.  Cake decoration is my weakness.  Felt so lucky that I took Cherry's advice of doing one cake only.  Otherwise, I would be stuck with a half decorated cake.  Then I would feel worse.  At least I have a completed cake now.


Hmm... I can bring this cake to my lunch party tomorrow, but it's too small.  I started baking another pavlova.  Still waiting for it to cool down in the oven.  I did not make the dent deep enough.  It expanded.  I hope the cream won't fall off too quickly.

Thursday, March 18, 2010

Japanese Melon Pan日式酥皮蜜瓜包


I call this a less greasy version of Hong Kong Style Bor Lor Buns 菠蘿包.  Some with chocolate chips too!  My kids gave them one thumb up when they had them for breakfast the next day.

Finally made bread at home for the first time.  I have always hesitated to make bread myself because I think it's too difficult and takes too long.  Then I found this recipe for Japanese Melon Pan.  http://happyhomebaking.blogspot.com/2007/08/japanese-melon-pan.html  Both Ho and I love bread from J-Town.  I decided to give it a try.

Since I still think that bread making is a long process, I measured everything last night.  Pastry ingredients on one side of the counter, and bread dough on the other side.   Tonight when I put the flour in with the yeast, I added the sugar for the pastry by mistake.  I also forgot the recipe suggested to leave some of the water behind to adjust the moisture level.  So I ended up throwing out the whole thing.  Back to step one - measuring everything again.  Other than this, the process seems to go smoothly but slowly as expected.  Why can't I bake as fast as Jennifer?

So, while the dough is proofing, I made the crust.  It's very sticky.  This picture was taken after I put them in the fridge for 20 mins.


Then I roll them out one by one, and covered each dough with a piece of pastry crust.


See the ones I had marked with initials of each member in the family?


This is the proper look of melon pan.  I think it looks like a grenade now.  :-)


The recipe said oven time was 12 mins at 170C (338 F).  10 mins passed, they still looked very pale.  I wonder if I should have brushed them with egg wash even though the recipe said only use sugar.


After adjusting the temperature to 350F and left the bread in the oven for 30 mins, I start to worry that the bread will be too dry.  So I took them out.


Surprisingly, the inside was not dry.  My husband said it tasted more like a cake.  Of course!  His first bite was mostly the crust.  When I gave him more of the bread part, he said it did have the bread texture.  However, I actually find it too moist.  Maybe I should have left them in the oven longer?  Yet bottom of the bread already started to harden...  Or maybe I didn't put enough yeast?  Or the proofing time was not enough.  They didn't rise to twice the size.  The crust is good though.

Well, they taste good now.  Next time!  Next time they'll be better.

Tuesday, March 16, 2010

Artic Mandarin Cheese Pie (No Bake)

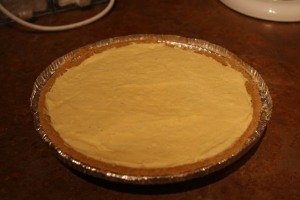
Naa, didn't bake this tonight, not that crazy.   Found this recipe from a recipe book for diabetics.  Sounds super easy, so I gave it a try.  Mixed 1 block of 8 oz cream cheese and 6 oz of thawed orange juice together, then stir in 1 cup of whipped cream.  Pour the mixture in a prebaked pie shell bought from store.  Cover and freeze for 4 hours. That's it!   I did this on Saturday.  We had too many desserts on Saturday already, including my mango bavarian cream, Jennifer's creme brulee, and cookies from GB!  We were so full that day that I didn't even bother to take the pie out from the freezer.

This is the pie before decorations.


Used one 10 fl oz can of mandarins to cover the top.


This kids were behaving very well tonight, so I offered this treat to them.  According to the recipe, I just need to remove the pie from freezer 10 mins from serving time, and decorate it with mandarins will be fine.  However, 10 mins are not enough because I could still feel the ice in my mouth.  As this was from a cookbook for diabetics, original asked for fat free cream cheese and whipped topping.  I've never seen fat free cream cheese in the stores I go to.  I have fresh whipping cream at home.  So my version is not exactly for diabetics.  Yet, it's still not too sweet. Ho thinks it's ok, just can't feel the smoothness with the ice in centre.  Adrian didn't like it, but he ate 2/3 of it!  Livie rejected it as usual like she rejects ice cream.  "Too cold, mommy!".  Ok, if I'm going to make it again, I think I'll do a lime flavour and let it sit in the fridgerator for half a day.  It should be better.

Zerba Cake


When was the last time I baked?  It was only last Tuesday but it seems so distant to me already.  Looking at Cherry's and Jennifer's blogs, I have to work hard to keep up!  Then I decided to make an easy fun looking cake last night.  When Ho, my husband, asked me why I was baking late at night, was it for work?  I told him, oh, you have a business meeting tomorrow morning.  This is for your breakfast. I can always find myself an excuse to bake. :-)  He's satisfied and went on with his housekeeping.  I have to give him credit for tidying up the house.  He does a very good job when he is determined.  It's almost like we moved to a new house these days.

So it is supposed to be an easy and fun looking cake.  From the original post http://cookingcrave.blogspot.com/2009/10/zebra-cake.html it is.  When I did it, it's not.  I couldn't find emulsifier and chocolate emulco anywhere.  First defeat there.  I read from a site saying that as long as I beat the batter long enough with ingredients added in proper order, I wouldn't need the eimulsifier.  As for the emulco, I just melted some bittersweet chocolate to replace it.  The batter was fine, until I added the chocolate/water mixture...

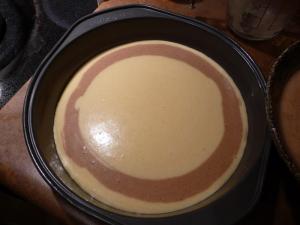
It was fun scooping the batter in the pan and see it spread out in 2 colours just like a zebra.


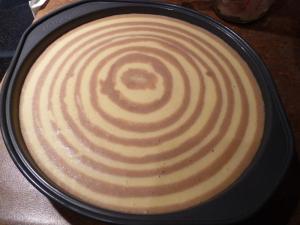
I like taking pictures of my baking in the oven lately...  It's exciting to see it rise properly even without the emulsifier.


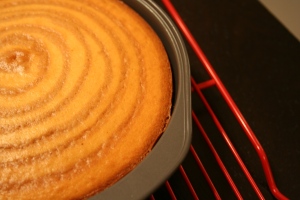
Freshly taken out from the oven.  You can still see the rings on top.  After letting cool in the pan for a few minutes, the cake separated from the pan nicely by itself.


I cut it up...

Oh no!  All the chocolate batter sunk to the bottom!


Oh well, I think I will simply melt the chocolate and mix it with cocoa with just a few drops of water next time.  Then the chocolate batter won't be too thin to sink.  Yet, the texture and taste are both very good.  As cookingcrave said, it's not too sweet.  I like it and will definitely make it again.  Hopefully I can post pictures of a cake with the 2 batters separated line by line very soon.

Sunday, March 14, 2010

Cards

Adrian is in love with magic these days and likes to perform magic tricks to people frequently.  One day last week he was holding a card in front of me.  Actually those are 2 cards stuck to each other back to back.

Adrian:  Ok, see this card?  Try to remember this card.

Me:  Adrian, did you stick 2 cards together?  (My concern is, he opened a new deck of cards and ruined 2 cards.)

Adrian:  You're supposed to remember the card and then I will tell you that the card has magically changed.

Me:  Son, but that's a new deck of cards, we won't be able to play with them anymore, 2 cards are gone!

Adrian:  That's ok, I still have 50 of them.

Saturday, March 13, 2010

Cookies - Baking Arts Week #8

Very tired today.  Started off hurting my hand when I tried to attached the whip to the standmixer.   The bruise is going to stay for a long while.  Oh man, it HURTS!  Lesson taught us, always attach the whip or whisk when there is no ingredients in the bowl.  The butter was too hard and it was in the way when I put the whip in the middle.  Well, I learned it the hard way.

Pretty neat looking cookies.  I piped the rosettes too big at the beginning.  Instructor wanted me to redo all of them.  Every cookie should be in 2-bite size.  That's ok, look on the bright side, I got more chances to practise.  :-)  Yet it made us the slowest team to finish piping and baking the cookies.  It was a lot of fun making them in different shapes.  Cookies can be so versatile.  We only used jam and chocolate, see how many variations we made?  I even wrote the kids' initials on 4 cookies.

I like the "S" shape the most.

Then we drizzled chocolate on some, dipped chocolate on some, or squeezed jam on or in between to make cookie sandwiches.  However, GB recipe used half shortening and half butter.  I find the cookies fluffy enough with volume but the flavour is not strong enough.  I'll use all butter if I'm going to make them again.